VPN with Cisco Secure Client for ChromeOS
Preliminary remark
You can find troubleshooting guidance below.
Note general
Some restricted services of the University or the State and University Library can only be used when you are on campus, so that the device you use has an address from the area assigned to the University.
To access these services from home or on the road, you must install a so-called VPN client software (AnyConnect or OpenConnect) on your device once and establish a connection to the campus with the VPN client before each access to the restricted services. This means that you are "virtually" on campus and can use the services you are used to.
Please note the different types of tunnels and make sure you choose the correct tunnel.
Initial Setup - Step 1
First, open the "Google Play Store" on your device. After that, search for "Cisco Secure Client-AnyConnect". Now click on "Install" at the top right corner.
Initial Setup - Step 2
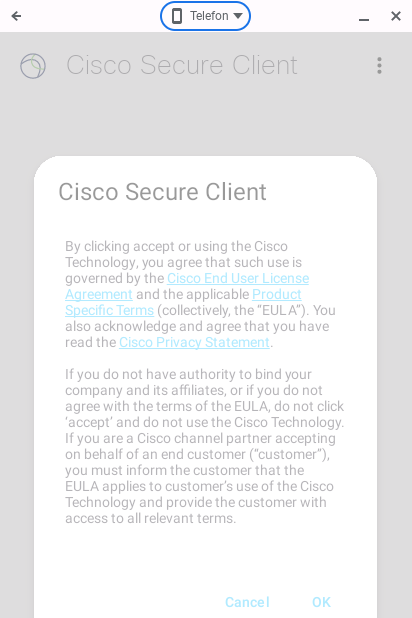
Now read and confirm the license agreements. If you do not agree to the license terms, then you will not be able to use the VPN service.
Initial Setup - Step 3
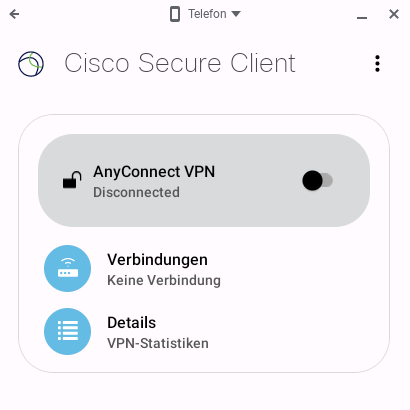
Now open AnyConnect. You will be greeted with the window from the image.
Now click on "Connections".

Initial Setup - Step 4
Now click on the "+" symbol at the bottom right.
Initial Setup - Step 5
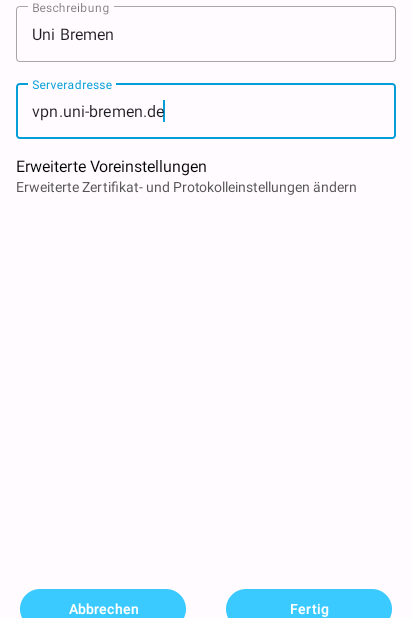
Now enter the required information:
- The description is freely selectable
- The server address must be "vpn.uni-bremen.de"
- "Advanced preferences" do not have to be adjusted
Now click on "Done" to create the VPN connection.

Connection - Step 1
If "Uni Bremen" is selected under "Connections", then click on "AnyConnect VPN" now.

Connection - Step 2
First select the correct tunnel type.
Then enter your university credentials under username and password.
If you have two-factor authentication (2FA) enabled on your Uni-Bremen account, please enter your one-time password (sometimes also referred to as a ‘second password’) in the field provided.
If you have not set up two-factor authentication (2FA), simply leave the field blank.
If the field is not visible, you can ignore this paragraph.
Finally, click on "Connect".

Connection - Step 3
Confirm the connection request with "OK". If you do not agree to this, you will not be able to use the VPN service.
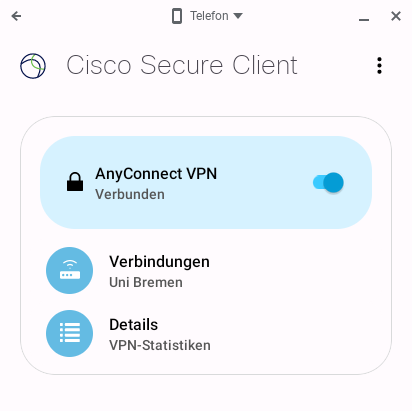
Connection - Step 4
If you are now successfully connected, you will see this by the colored slider.
Troubleshooting
Untrusted certificate
If you receive the error message “Untrusted certificate” after setting up the VPN,
the certificate from our certification authority (HARICA) is missing from your Chrome OS.
To import the certificate authority’s certificate, please follow these steps:

Step 1 - Download certificates
Download the two certificates on https://doku.tid.dfn.de/de:dfnpki:tcs:2025:cacerts (under “Root-CA-Zertifikate 2021 für Serverzertifikate”)
The certificates you need are:
- HARICA TLS RSA Root CA 2021
- HARICA TLS ECC Root CA 2021
Please download the certificates in '.cer'-format (by clicking on the links next to ‘.cer’).


Step 2 - Import certificates
To import the certificates, you need to open the Android settings on your Chrome OS device.
You can find these in the settings under “Apps → Android settings”.
In the Android settings, please go to “Security → Additional security settings → Credentials → Install a certificate”
Select “CA certificate”.
Then select the first of the two certificates from Step 1 and click “Open”.
In the “Your data will not be protected” dialogue, please select “Install anyway”.
Repeat the steps for the second certificate.
Once both certificates have been imported, the message should no longer appear when establishing the VPN connection.