Video upload with the Opencast plugin
With the Opencast plug-in you can upload lecture recordings and other videos to our OpenCast server and integrate them into Stud.IP.
The OpenCast plugin offers the following advantages, among others:
- No file size restriction: as the videos are automatically converted after uploading to our external OpenCast server, you do not have to consider any file size restriction for your video upload. Nevertheless, we recommend compressing large video files with the freeware tool Handbrake, as uploading large video files can take a long time even with fast internet connections.
- No performance loss of the Stud.IP system: Due to the processing and provision of the videos on our external OpenCast server, the video upload via the plugin has no negative impact on the performance of the Stud.IP system.
Attention: In order to upload videos, the status lecturer or tutor is required!
Important information about the PlugIn
@Lecturers:
- Please check for all videos whether the visibility for students is set (the new default is invisible).
- If you still need to activate the visibility for participants, please wait a while after setting it to visible. When you call up the Opencast tab again, the message "The video is being processed" appears. This information means that the visibility rights are being transferred to the server.
- When the video has finished being processed, you can check via the "Simulate student view" whether the video is actually visible and playable for the students. (Event > Administration tab > left side navigation Actions: Simulate student view)
@Students:
- If a video is not playable, please use the feedback button by the video and send this email with a short explanation of the problem and the "link to the affected video" to the support team.
Activating the OpenCast plug-in
1. In the menu bar of your event, click on the last menu item More ...
2. Activate the plug-in by ticking OpenCast in the Content and Tasks section. OpenCast now appears in the menu bar of your event.
Video upload in the OpenCast plugin
3. click on the OpenCast tab. If you have not yet uploaded a video, the message "You do not yet have a Series from Opencast linked to this event." appears first.
4.1. Click on Create New Series under Actions on the left. The message "No lecture recordings have been made available yet." will appear.
4.2. The Opencast tab is not visible to your students by default. Click on "Make tab visible" to switch on the visibility. 5.
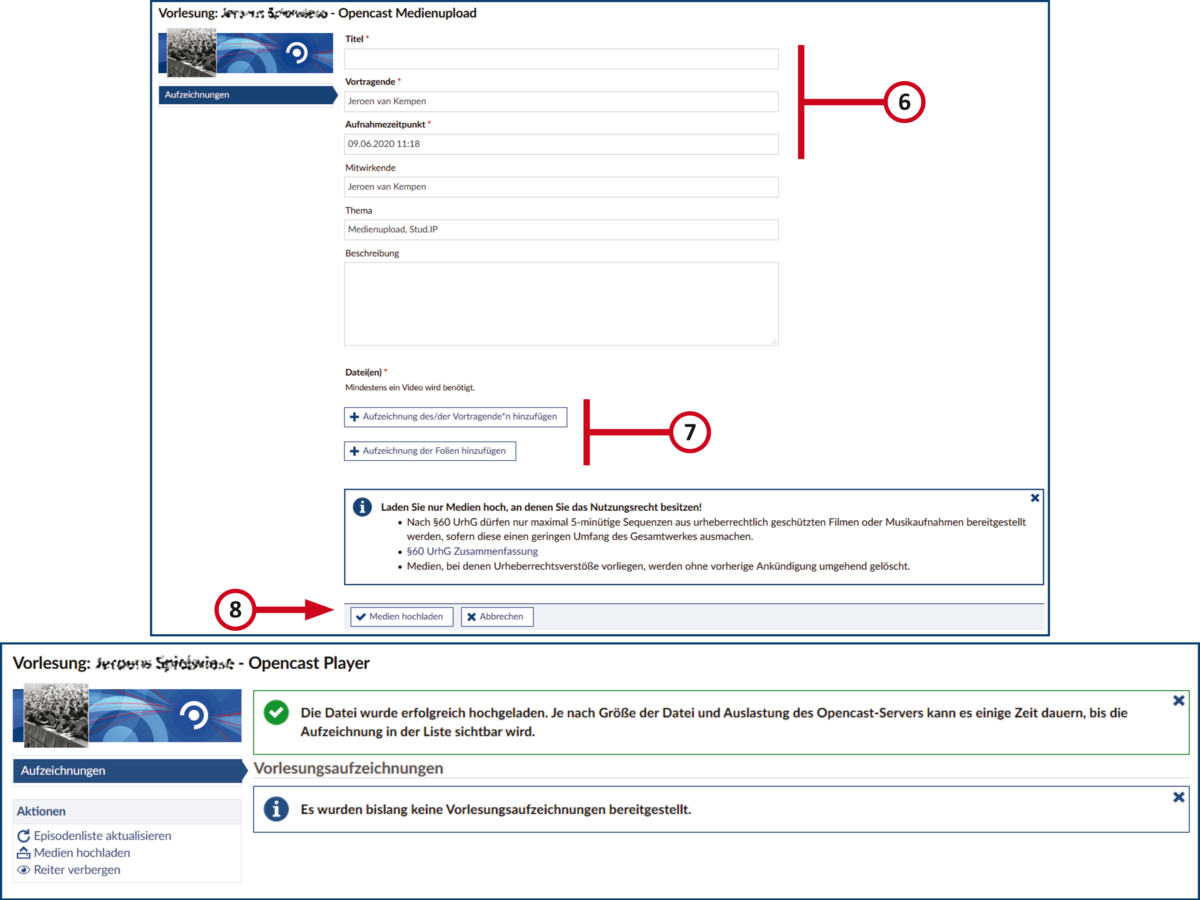
5. Click on Upload Media. The Opencast Media Upload dialogue box opens. 6.
6.Fill in the metadata fields as precisely as possible (minimum required fields: Title, Presenter(s), Recording times). 7.
7. scroll down to "File(s)". You can upload a single video or exactly two videos, which will later be played synchronously side by side in the video player.
- Case 1: Upload one video
If you have only one video, select either "Add recording of presenter(s)" or "Add recording of slides". In the file browser, select your video file and click Open. - Case 2: Upload two videos and play them synchronously
First, make sure that both videos have the same length and the same start time. Double recordings with Opencast Studio already have these properties. Under "Add recording of speaker(s)", select the video in which the speaker can be seen. Under "Add recording of slides", select another video, such as a board recording or video of one of your slides.
Attention: Opencast only processes valid video files. Documents, images and other files will result in an error. 8.
8. Now click on Upload Media. The file will now be transferred to the server, a progress bar shows the progress.
Attention: After the upload, your video is first processed on our external OpenCast server. Therefore, it is not yet directly visible and retrievable in the list. This process takes a longer time depending on the file size. As the processing takes place in the background and externally, this has no effect on the load of the Stud.IP system. You can immediately upload more videos or perform other actions in Stud.IP.
Visibility of your videos
By default, your uploads are invisible to all participants in your event. If you want participants to be able to see a specific video you have uploaded, please click on the corresponding Video is visible only to you button in the episode list. Select visible and click save. Attention: The process of making the video visible/invisible leads to an editing process on the Opencast server, which takes about two minutes.
Opencast Editor
With the help of the Opencast Editor, you can edit your recordings uploaded to Stud.IP in an easy-to-use interface and, for example, also adjust metadata such as the title. (You can find instructions on how to use the editor here)


