Opencast written step-by-step guide
Starting from the winter semester 2023/24: Opencast is now accessible to everyone after a short online self-training!
We have reconfigured the system to provide easier access to Opencast technology for lecture recordings. A presence-based training like before is no longer necessary. Feel free to take a look at the updated instructions. If you have any questions, please don't hesitate to send an email to: opencastprotect me ?!elearning.uni-bremenprotect me ?!.de
Automatic subtitles in German and English for every video
Thanks to WhisperAI, we now have the capability to automatically subtitle all Opencast recordings, including translation into English. The subtitles are of very high quality and can even recognize specialized terminology without any issues.
Recordings
What do you need to do if you want to record your event with Opencast?
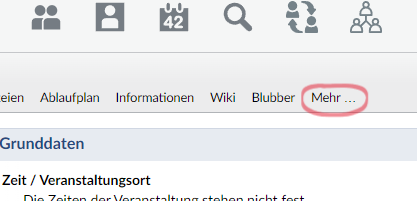
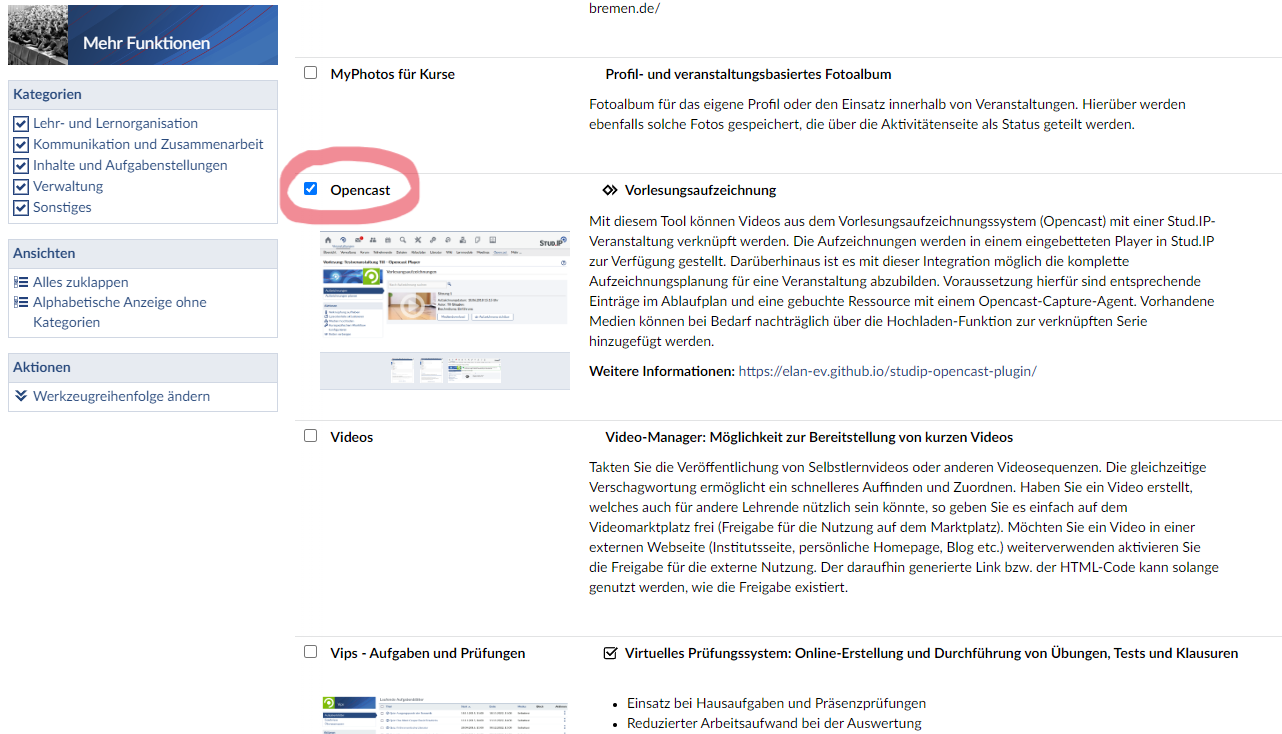
I.) Activate the Opencast plugin in your Stud.IP event. To do this, click on "More..." within your Stud.IP event and scroll down to Opencast. By checking the box there, you activate the plugin, and Opencast will now appear in the menu bar of your event.
Note: Automated recording with Opencast is not available in all rooms of the university. Currently, the following rooms are equipped with recording technology: see the right-hand side.
For further information about equipment in rooms at the University of Bremen, please refer to the Website of the Media Office.


I.) Opencast now appears in the menu bar of your event.
II.) Click on the Opencast tab. Please take note of the terms of use. You must accept these to be able to use the features of the Opencast plugin.
III.) Under "Configuration" on the left, you have the option to create a new series where all your new videos will be stored or to link your event to one of your existing series.
Please note: If you edit or delete videos from a linked series, you will do so for ALL events linked to that series. It is advisable to hide videos rather than delete them if you don't need them for a particular event.
IV.) By default, the Opencast tab is not visible to your students. Click on "Make tab visible" to make the Opencast tab visible to your students.

When scheduling your lecture recordings in Stud.IP, the event data (title, room, time of the session to be recorded, organizer's name) is transmitted to the respective recorder in the lecture hall. Only in this way can the recorder identify you and associate the recording with the corresponding event in Stud.IP.
I.) First, click on the "Opencast" tab. (1)
II.) Click on "Schedule Recordings" on the left. (2)
You will see an overview of your lecture dates.
On the right side of the overview, you will see the status of each appointment and available actions in the form of the following symbols:
A recording is scheduled. (3) No recording is scheduled yet. (4) The date is in the past – recording is no longer possible, or the recording is completed. (5) Plan the recording of an individual session. (6)
III.) Click on the blue camera icon (6) to schedule a recording.
Note: Complete the scheduling at least half an hour before the start of a lecture session. Otherwise, the recorder will not activate.
You will receive a success message, "Recording has been scheduled." (7)
Two new symbols will appear next to your scheduled recording.
IV.) You can update the metadata using the circular arrow symbol (8). You can cancel the recording scheduling using the trash can symbol (8).
Note: Just schedule all lecture dates in advance, if the recording will not be started by entering the PIN; nothing will happen. Please note that you cannot start the recording before the scheduled time, and you cannot overrun. For example, if you scheduled from 10:00 AM to 12:00 PM, the recording will end promptly at 12:00 PM.
FOR AUDIO: Make sure to use one of the microphones in the room and turn it on or off as needed, so the microphone is lit green. Otherwise, the audio cannot be recorded. You can obtain the key to the microphone cabinet, which is next to the touch panels, at the event office, and you can keep it for the entire semester (and beyond). Tip: If the microphone is correctly turned on, you will hear yourself through the room's speakers; if not, it is not turned on.
As an organizer, you are responsible for the content and captured information during a recording. Therefore, we are providing you with the following basic legal requirements that must be strictly adhered to.


I.) If you have scheduled your recordings in Opencast through Stud.IP, the recorder assigned to your event will be put in standby mode in the respective lecture hall at the session's start time (e.g., at 10:00). The media control will indicate the readiness of the recorder to start the planned recording with a green light. (1)
II.) To initiate the actual recording, select the "Recording" tab on the media control. (2) Authorize the recording by entering the PIN 159753. The light above the media control will now flash red, indicating an active recording. (3) If you have activated the livestream plugin (see instructions below), the livestream will also start now. Don't forget to turn on the microphone!
III.) You can pause the recording using the pause button. (4) Clicking on "Recording" will resume the original recording. (5)
IV.) Use the stop button to end a recording (prematurely). (6) CAUTION: Stopped recordings cannot be resumed. In this case, you must start a new recording, which will no longer be automatically assigned to your event. Please contact the ZMML via email in such a case. (opencastprotect me ?!elearning.uni-bremenprotect me ?!.de)
If you do not manually stop the recording, it will be automatically terminated at the end of the scheduled time.
V.) Click on the preview thumbnails to select a possible camera perspective. (7) The lecture hall camera will automatically zoom and pan to the specified position. In large lecture halls with the touch panel at the lectern, you will have a live preview image from the camera instead of fixed preview thumbnails.
Note: If you ever forget to schedule a recording in Stud.IP, you can also perform ad-hoc recordings. Enter the PIN and start a recording. The light will now flash red. To associate the recording with you and your event in Stud.IP, please send an email to the ZMML. Ad-hoc recordings are not automatically published to prevent misuse by third parties.
![[Translate to English:] Aufnahmen verwalten](/fileadmin/user_upload/sites/zmml/Arbeitsbereiche-und-Projekte/Medienproduktion/Images/Opencast_Bearbeitung_neu.jpg "[Translate to English:] Aufnahmen verwalten")
![[Translate to English:] Downloads erlauben](/fileadmin/user_upload/sites/zmml/Arbeitsbereiche-und-Projekte/Medienproduktion/Images/Downloads_erlauben.png "[Translate to English:] Downloads erlauben")
Depending on the length of the recording, the processing of video materials and their availability in Stud.IP may take several hours.
I.) Once your recordings have been processed by the system, they will be available for preview in your event in Stud.IP under the Opencast tab.
II.) You can:
- Send an email to technical support specific to a video using the "Feedback" button.
- Make your recordings visible or invisible to students.
- Open the video editor to edit your recordings after the fact. (You can find instructions for the video editor here.)
- Download the video.
- Reload the metadata if you have made changes and processed them in the video editor (refresh the video data of this video with cleared cache).
- Permanently and irreversibly delete a recording. CAUTION: Once recordings are permanently deleted, they cannot be recovered.
III.) You have the option to allow students to download the recordings by clicking "Allow Downloads." Until you explicitly allow this, students will not be able to download the videos.
Livestreams
What do you need to do if you want to livestream your event with Opencast?
I.) Click on the last menu item "More..." in the menu bar of your event in Stud.IP.
II.) Activate the plugin by checking the box for "Livestreams" in the "Content and Tasks" section. "Livestreams" will now appear in the menu bar of your event.
III.) By default, the Livestreams tab is not visible to your students. Click on "Make tab visible" to enable visibility.
Prerequisite to start an automatic livestream for your event is that the room must be booked in Stud.IP for the corresponding time period.
I.) Start the livestream by selecting the "Recording" tab on the media control during the time period reserved for you. Authorize yourself by entering the PIN 159753. (Important: If no Opencast recording was planned, you must specifically choose "Start Recording" on the touch panel to initiate the livestream.) The light above the media control will now flash red, indicating an active livestream. If you have scheduled an Opencast recording, it will also start with the input of the PIN.
II.) End the livestream (and any scheduled Opencast recording) at the end of your event by tapping "Stop Recording" on the touch panel.
Note: Livestreams only work within the time frame reserved on Stud.IP for your Stud.IP event. For example, if you have booked the large lecture hall from 10:00 AM to 12:00 PM, you can start the livestream no earlier than 10:00 AM, and it will only be viewable on Stud.IP until 12:00 PM at the latest. Opencast recording technology is not available in all rooms at the university. Currently, the following rooms are equipped with recording technology: see the right side.
FOR AUDIO: Be sure to use one of the microphones in the room and turn it on or off as needed, so the microphone is lit green. Otherwise, the sound cannot be recorded. You can obtain the key to the microphone cabinet, which is next to the touch panels, at the event office, and you can keep it for the entire semester (and beyond). Tip: If the microphone is correctly turned on, you will hear yourself through the room's speakers; if not, it is not turned on.


There is the option to activate a live chat in the Livestream plugin of your Stud.IP event. If you want to use the live chat for student questions or similar purposes, please be aware that there is a time delay of approximately 7-40 seconds for viewers of the livestream.
Select "Activate Live Chat" in the Livestream window of your event to use this feature.
Note: We strongly recommend not using the livestream for events that involve interactive participation and feedback from online-viewing students. The livestream is intended for high-quality streaming, which can even transmit the chalkboard clearly, resulting in the time delay.
Lecture Halls and Rooms with Opencast
The following lecture rooms are equipped with fixed recording technology:
Keksdose
- großer Hörsaal HS-2010
- kleiner Hörsaal HS-1010
MZH
- MZH - Senatssaal 1400
- MZH - Raum 1460
- MZH - Raum 1470
- MZH - Raum 1090
- MZH - Raum 6200
GW1
- GW1 - Hörsaal H0070
- GW1 - Raum B0080
- GW1 - Raum B0100
GW2
- GW2 - Raum B2880
- GW2 - Raum B2890
- GW2 - Raum B2900
- GW2 - Raum B1400
- GW2 - Raum B1405
- GW2 - Raum B1410
- GW2 - Raum B3009
NW1
- NW1 - Hörsaal H1
- NW1 - Hörsaal H2
- NW1 - Hörsaal H3
NW2
- NW2 - Hörsaal C0300
- NW2 - Hörsaal C0290
BIOM
- BIOM - 1060
- BIOM - 2060
- BIOM - 3060
SFG
- SFG - Raum 0140
- SFG - Raum 0150
- SFG - Raum 1010
- SFG - Raum 1020
- SFG - Raum 1030
- SFG - Raum 1040
- SFG - Raum 2010
- SFG - Raum 2020
- SFG - Raum 2030
- SFG - Raum 2040
WiWi1
- WiWi1 - Raum A1100
- WiWi1 - Raum A1070
Grazer Straße
- Grazer Str.2a - Raum 0100
Cartesium
- Cartesium - 0.67 (Rotunde)
For more information about equipment in rooms at the University of Bremen, please refer to the Media Office´s Website
Streaming via Zoom: These rooms are equipped with a USB connection through which the camera feed and audio from the lecture hall system are provided. The system registers itself as a pseudo-webcam via USB on the instructor's notebook and can then be used, for example, in Zoom.
Instruction Media Office
Opencast guide as a PDF (recordings & livestreams)
Instruction_Opencast_12_09_2023.pdf
File name: Instruction_Opencast_12_09_2023.pdfLast update: 12.09.2023
